This vegan chocolate orange cake is so soft and fluffy, even though made completely without dairy products, eggs or butter. Makes for a healthier cake that uses fresh orange juice and is perfect for so many celebrations such as Christmas, Easter or Valentine's day.

You know Terry's chocolate orange? The chocolate candy that looks and even tastes like oranges? Well, this is a cake version of Terry's chocolate. But even better.
I have been on a chocolate dessert mania lately and just shared no bake chocolate bars and cacao red velvet cookies. Oh and these chocolate chip raw cookie dough bites. These are so darn good.
And to keep going in my chocolate zone, I made nothing less than this gooey chocolate orange cake. It is soft and fluffy and pretty much melts-in-your-mouth, plus it was absolutely the best way to use and showcase my vegan dark chocolate frosting. It is so tender and flavorful, hard to believe this is a low-fat vegan cake!
The classic chocolate-orange flavor combo here is absolutely amazing. There is just the right amount of zesty flavors that sits perfectly among the dark chocolate batter. The frosting has no orange flavor, only dark chocolate yumminess, which prevent the zesty flavor from being too overpowering.
And I love the fact that this eggless chocolate orange cake recipe uses only fresh oranges, no orange artificial flavor at all! And other than having sugar from the chocolate chips (in the frosting), this vegan cake is super healthy too.
Make it for any celebrations, but especially for Christmas, Easter or Valentine's day. Or any time really! Great as an afternoon treat, you can have a few slices and freeze the rest to be ready-to-go at your next chocolate craving.
I really hope you add this recipe on your to-bake list!

Why you'll love this recipe
- Simple and requires only easy baking techniques
- Moist and tender
- Made without eggs and butter (no vegan butter neither!)
- Fully vegan and dairy-free
- No artificial orange flavoring
- Loaded with dark chocolate and zesty orange flavors
Ingredients you'll need
- Flour: I used all-purpose regular flour. I actually tested with a white whole wheat flour and although the cake was a little too dry, it still worked ok. If you wanted to use some whole wheat flour, then I would do 50% max of whole wheat flour.
- Raw cacao powder: cocoa powder works too, although it is more processed.
- Baking powder + baking soda: leveling agents.
- Salt
- Coconut oil: use refined to avoid a coconut flavor. Do not substitute for any other oil (I only tested with coconut oil).
- Maple syrup: granulated sugar will not work well and might create a batter that's not moist enough. If you don't have maple syrup, then use agave or brown rice syrup instead.
- Orange juice + zest: fresh oranges are so much better than store-bought juice.
- + 2 batches of this vegan dark chocolate frosting: for this recipe, you will need coconut oil, vegan dark chocolate chips and canned coconut milk.

How to make it
Make the frosting
I like to start by making the dark chocolate frosting. Once combined, the mixture has to cool down before whipping, so you can make the cake batter during that time to avoid any down time. Simply whip the frosting when the cake is baking or cooling down.
Make the cake batter
Pre-heat the oven to 350º. Also, line the bottom of 2x 8 inches round cake pan with parchment paper. Then, using coconut oil, grease the sides of the cake pan.
Start by zesting and then juicing your oranges. Also, melt the coconut oil (I simply use the microwave, 15-30 seconds at the time until liquid).
Combine the dry ingredients (flour, cacao powder, baking powder, baking soda, salt) and stir until combine. You can sift the cacao powder to avoid lumps.
Then, combine the wet together (orange juice, orange zest, maple syrup and melted coconut oil). Whisk well to combine.
Pour the wet over the dry and stir to combine. You will notice that the cake batter fluffs and creates a lot of bubbles quickly, this is normal! The baking soda reacts with the acidity from the orange juice to help make the cake fluffier. It is not meant to be a pourable kind of batter.
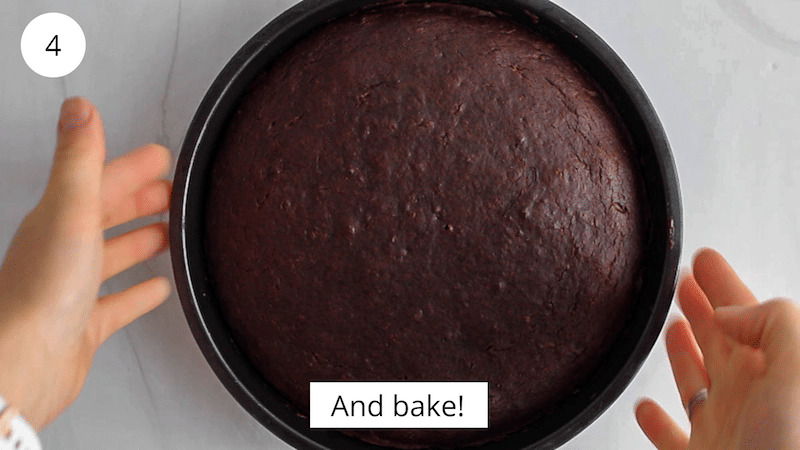
Divide the batter in between both prepared cake pan and use a spoon or spatula to evenly spread it out (it won't spread easily by itself). Bake for 20 minutes or until a toothpick comes out clean without any raw batter sticking to it.
Once done, set the cakes on the counter so they can cool down.
During that time, I usually finish up my frosting by whipping it.


Build the cake
Once the cakes have cooled down and the frosting is nice and fluffy, then you can build your layered cake!
Transfer one of the cake on a serving plate or platter, then cover with a thin layer of frosting. Transfer the second cake over and completely frost the cake.
Enjoy! 🙂


Watch how to make it

Baking tips
- Be sure to zest only the orange colored parts of the fruit's skin as the white underneath layer is bitter!
- Zest the orange before juicing them! It is harder to zest them once they are halved and juiced.
- Take the oranges and the maple syrup out of the fridge ahead of time if you can. If they are too cold, they might clump the melted coconut oil when combining the wet ingredients.
- Don't overmix the batter!
- Unless you grease the cake pans really well, don't forget to cover their bottoms with parchment paper. The cakes are soft and gentle and without the paper they might break when unmolding. Add a little coconut oil under the parchment paper to help the sheet stick to the pan and grease the sides a little.
- If your cake has a dome shape after done baking, you could slice the top off gently lengthwise. I usually don't as I don't mind it.
- Be sure to let the cakes completely cool down before frosting.
- You can add a small amount of frosting on your serving plate before transferring the cake over so it sticks to it better.
- Feel free to add some vegan chocolate chips to the cake batter for an even more chocolatey cake!

What kind of oranges to use
I prefer using Navel oranges for this recipe as they are juicier and usually super sweet. I believe tangelo oranges would work great as well. Other kinds of oranges are fine, but might change the overall flavor if they are more bitter.
Blood oranges would also be a good choice: they have a nice sweet and caramelized flavor that would pair well with the dark chocolate batter. They would also add color if using them to decorate the cake.
Decorating your cake
Once your vegan chocolate orange cake is all frosted, then you can decorate with some fresh slices of oranges, orange peels, orange zest or even chocolate covered candied oranges if you have the extra time! Topping with fresh fruits not only adds color but also provides a sneak peek on how the dark cake is flavored.
But, if covering the cake with fresh oranges, be sure to do so only when ready to serve and remove them before storing the cake. The oranges will release some juice overtime and might turn the frosting runny.
Other decorating ideas include shaved chocolate, chopped chocolate chips, drizzle of melted chocolate or make more of the frosting to have extra to pipe around the cake as flowers, etc.

Storage
This cake stores pretty well. I kept mine covered at room temperature for 24-48 hours and it stayed really good. Transfer in the fridge for longer storage, making sure to cover well as the cake will quickly dry out.
And you know what? It freezes so well too! Every time I make it, I always end up freezing almost half of it as its only the 4 of us eating it and it works out well. Let it thaw in the fridge or at room temperature before enjoying. I also like to warm it up in the microwave for a few seconds: the frosting gets so gooey and you end up with a chocolate cake drowning in a silky rich chocolate sauce. OMG.

More vegan cake recipes to try!
- Vegan raw blueberry cheesecake
- Vegan black forest cake
- Blueberry lemon mug cake
- Vegan banana mug cake
- Vegan rhubarb cake
- Mug brownie
- Vegan plum cake
- Vegan pineapple upside down cake
Other chocolate recipes you might like
- No bake chocolate oatmeal bars
- Chocolate avocado pudding
- Strawberry chocolate smoothie
- Pumpkin chocolate chip cookies
- Peanut butter chocolate rice krispie treats
- Beet chocolate muffins
- Strawberry chocolate bars
- Chocolate banana milkshake
- Vegan mug brownie
- Chocolate covered chickpeas
I hope you like this vegan chocolate orange cake as much as we do! If you try it, please leave a comment below and rate the recipe to let me know how it was. Your feedback is so helpful!
Let's stay in touch with Instagram, Pinterest and Facebook. Also, don't forget to subscribe to my newsletter to be sure not to miss anything.
📖 Recipe

Vegan Chocolate Orange Cake
Ingredients
For the cake
- 2 ¼ cup all-purpose flour - (or 1 ½ cup all-purpose + ¾ cup whole wheat)
- ¾ cup raw cacao powder
- 1 ½ tsp baking soda
- 1 ½ tsp baking powder
- pinch of salt
- ½ cup refined coconut oil - melted
- ¾ cup maple syrup - or agave nectar
- 1 ½ cup freshly squeezed orange juice - store-bought works too
- zest of 1 orange
+ 2 batches of Vegan dark chocolate frosting
Instructions
- Pre-heat the oven to 350º. Line 2 x 8 inches round cake pans with parchment paper. Also, you can use a little coconut oil to grease their sides so they don't stick to it.
- In a large bowl, combine the flour, cacao powder, baking powder, baking soda and salt.
- In a medium bowl, combine the orange juice, orange zest, maple syrup and melted coconut oil.
- Pour the wet over the dry and stir to combine (the batter will be light and very airy, it is not meant to be a pourable kind of batter).
- Divid the batter in between both prepared cake pans and even their surface using a spoon or a spatula.
- Bake in the oven for 20 minutes or until a tooth pick comes out clean and without any raw batter sticking to it. Set aside on the counter so the cakes cool down (essential before frosting).
- Then, run a knife around the cakes and gently un mold them. Place one cake over your serving platter, spread a thin layer of frosting over, then top with the second cake. Finish up by covering the whole cake with the frosting. Decorate with some oranges, zest or chocolate chips and serve.
Video
Notes
- The vegan dark chocolate frosting requires some melting, cooling and whipping time. So what I do is actually start by making the frosting and once I transfer the bowl in the fridge to cool down (see the recipe), I make the cakes. When the cakes are baking and cooling down, then I finish up the frosting by whipping it. That way, everything is ready about at the same time!
- Storage: store the cake (covered) at room temperature for 1-2 days. For longer than that, transfer to the fridge or even freeze it.
- Don't skip covering the bottom with parchment paper! The cake can be delicate and you don't want to break it when un molding.
- Feel free to add some chocolate chips to the cake batter for an extra chocolatey cake. Also add more zest if you are looking for a good punch of zesty flavor (but do not add more juice).
- Don't overmix the batter!
- Nutrition: please note that the nutritional information is an estimate per serving provided for informational purposes only (calculated by software) and accuracy is not guaranteed. Consult with your healthcare provider or a registered dietitian if you need precise nutrition calculations for health reasons.
NUTRITION
Pin it for later!


Leave a Reply