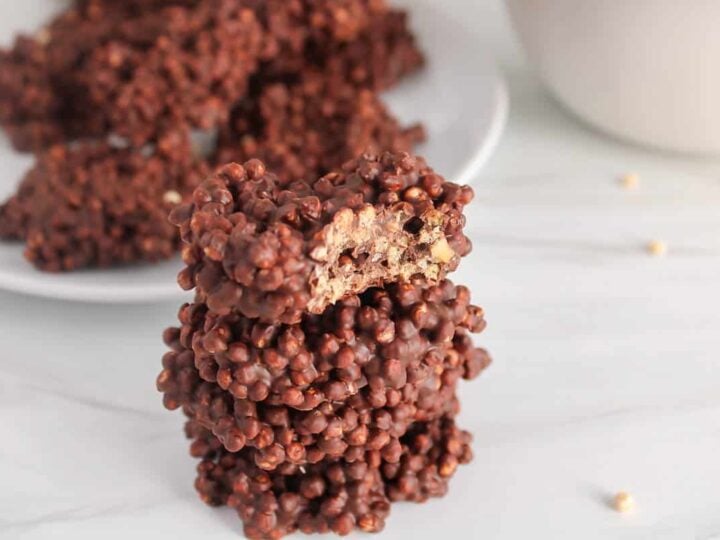
These ultra easy dark chocolate covered chickpeas are full of flavor and hide a crispy center made out of chickpeas! They make for a high-in-protein vegan snack that's also rich in fiber and very satisfying. Make these nut-free treats ahead to add to lunch boxes, kids love them!

If you are looking for an easy vegan protein snack, then you will love these chocolate covered chickpeas!
It is so easy to make and requires only 3 simple ingredients: canned chickpeas dark chocolate chips and a little coconut oil. They make for amazing crunchy bite-size healthy snacks that are big in dark chocolate flavor, but also high-in-protein and rich-in-fiber.
Also check out these chocolate covered pineapple rings and these chocolate-covered strawberry yogurt clusters for a similar snack idea!
Hope you enjoy! 💜
❤️ Why you'll love this recipe
- Easy recipe with simple steps
- Great source of plant-based protein
- Made using 3 simple ingredients
- No added white sugar
- Crispy and full of chocolate flavor
- Vegan, dairy-free, nut-free and gluten-free
🗒 Ingredient notes (+ substitutions)

- Canned chickpeas: you cannot make this recipe using dried chickpeas, even if you soak them before. You could use homemade cooked chickpeas, but using canned chickpeas makes this recipe super convenient. Do not use raw chickpeas!
- Coconut oil: helps solidify the chocolate clusters after chilled to a crunchy shell. Use refined to avoid a coconut flavor.
- Vegan dark chocolate chips: I love these vegan chips from Enjoy Life. They have a nice dark chocolate flavor and are made completely dairy-free!
⭐️ Full list of ingredients (+ quantities) down below in the recipe card!
🍽 How to make chocolate covered chickpeas

Step 1: Preheat the oven to 350ºF and line a baking sheet with parchment paper. Rinse and drain the canned chickpeas very well (I like to also pat dry them). If some of the skins detach from the chickpeas, discard them. Place the chickpeas over the baking sheet.

Step 2: Bake in the oven for 50-60 minutes. Stir every 15-20 minutes so they roast evenly. The chickpeas are ready when they are crispy and look dry. Let them cool down.

Step 3: While the roasted chickpeas are cooling down, combine the chocolate chips and coconut oil in a medium bowl and melt in the microwave 30 seconds at the time (it takes me about 1 - 1 ½ minutes). When most of the chocolate chips are melted, stir to help them fully melt. Be careful not to overcook the chocolate!

Step 4: Transfer the roasted chickpeas into the bowl with the melted chocolate and stir to completely cover them.

Step 5: Using the same baking sheet you used to roast the chickpeas, divide the chocolate chickpeas into bite-sized little clusters (about 12) using a spoon.

Step 6: This is optional, but you can also top them with a little coarse sea salt while the chocolate is still soft. Transfer the baking sheet to the fridge until the clusters are set (about 30 minutes). Enjoy!
⭐️ Detailed recipe (+ video) down below in the recipe card!

➡️ How to know when are the chickpeas are done roasting?
You really want to crisp the chickpeas nicely before coating them with the melted chocolate.
If you have a convection oven, it could take you less time to crisp them, somewhere around 40-45 minutes. But, with a regular oven, you will probably need at least 50 minutes or even 1 hour of cooking.
How do you know they are ready? Check for these signs:
- They are hard and very crispy (taste test!).
- They turned darker in color.
- They are smaller and some of them look cracked.
- They even feel a little powdery when you break them.
Toss and taste them once in a while to better evaluate when they are done!
💡 Helpful tips
- Pat dry the chickpeas to remove as much moisture as you can. This will help crisp them quicker.
- Cool down the crispy chickpeas before tossing in the melted chocolate, this will help keep them crispy.
- I prefer to melt the chocolate in the microwave, but you could also melt it using the double boiler method. Once most chips (but not all) look melted, stir and the rest will keep melting too while moving them around. This can prevent overcooking.
- You can add some dried fruits, nuts, shredded coconut, rice krispies, etc to your clusters!

❗️Storage tips
These chocolate covered chickpeas store very well in the fridge in an airtight container for up to 5 days. The chickpeas tend to soften a little bit, but not that much and they remained great!
❓ FAQs
Yes it is possible, although the texture is better when using coconut oil as it helps to firm up the clusters while chilling.
I haven't tried it yet, but I believe you could freeze them. The chickpeas might end up less crispy after thawed, but I think it would work out.
Yes! Chocolate chips do have some sugar, but the chickpeas are high in fiber and rich in plant-based protein, making them a great addition to your diet. Use a brand of chocolate that's healthier and lower in added sugar if possible.
I love to sneak chickpeas in chocolate sweet treats! They are naturally hearty in flavor, which pair well with dark chocolate. Once the chickpeas are roasted, they are actually milder in flavor and you are left with their nice crispy texture.

🌱 More vegan dessert recipes made with beans


I hope you like these chocolate covered chickpeas as much as we do! If you try them, please leave a comment below and rate the recipe to let me know how they were. Your feedback is so helpful!
Let's stay in touch with Instagram, Pinterest and Facebook. Also, don't forget to subscribe to my newsletter to be sure not to miss anything.
📖 Recipe

Chocolate Covered Chickpeas (3-Ingredient Recipe)
Ingredients
- 15 oz canned chickpeas - rinsed, drained and pat dry
- ¾ cup vegan dark chocolate chips
- ½ tbsp coconut oil - refined or not, melted
Instructions
- Pre-heat the oven to 350º and line a baking sheet with parchment paper.
- Add the chickpeas to the baking sheet and roast them until crispy, about 50-60 minutes. Shake the pan every 15-20 minutes or so and towards the end, taste the chickpeas to see if they are done. They should be smaller, darker in color, crispy and even a little hard and somehow turn a little powdery if you crush them. Once done, set the pan aside so they cool down.
- Once the chickpeas are done, melt the chocolate: transfer the chocolate chips and coconut oil to a medium bowl and warm up in the microwave 30 seconds at the time until mostly melted. It usually takes me about 1-1½ minutes. Once most of the chips look melted, help them completely melt by stirring in the bowl.
- Transfer the roasted chickpeas to the melted chocolate sauce and stir to combine. Transfer the chocolate covered chickpeas to the same baking sheet you used to roast the chickpeas using spoons. I like to create about 12 mini clusters, but the size and number can vary depending of what you want. You can also sprinkle some coarse sea salt over the clusters while the chocolate is still wet.
- Transfer the baking sheet to the fridge and let them set for about 30 minutes before enjoying.
Video
Notes
-
How do you know the chickpeas are done roasting? Check for these signs:
-
- They are hard and very crispy (taste test!).
-
- They turned darker in color.
-
- They are smaller and some of them look cracked.
-
- They even feel a little powdery when you break them.
-
- Store the clusters in the fridge for up to 5 days so they stay crispy.
- You can add some dried fruits, shredded coconut, nuts, etc as well.
- Use nut-free chocolate chips to make them safe for school lunch boxes. I like these vegan dark chocolate chip from the brand Enjoy Life.
- Nutrition: please note that the nutritional information is an estimate per serving provided for informational purposes only (calculated by software) and accuracy is not guaranteed. Consult with your healthcare provider or a registered dietitian if you need precise nutrition calculations for health reasons.


Just made these, they are lovely. Thanks for sharing! x
Hi Agnes, thanks so much for your comment! Glad you liked this recipe! 😊
Love it! I used the air fryer came out so crunchy! Thanks for sharing!
Oh, I have to try it in the air fryer! Thanks for your feedback 😊
Omg! These were the most magnificent chocolate clusters that I’ve EVER EATEN! Making them was SO easy & I just want to say THANK YOU, THANK YOU, THANK YOU…. You’re the best❣️
Oh this is so great! Thank you so much for your comment! 🙂
Seriously, I can’t believe I’m the only one who’s commented on this recipe! So easy ( I actually used air fryer to get garbanzo beans crispy🤭) and comes out with a beautiful presentation & the taste?! Couldn’t be any better!
Hi! Yes, you are officially the first one to comment! And thank you so much for doing that 🙂 Air frying the chickpeas sounds like a great idea. I am so glad you liked them, we are big fans over here too.