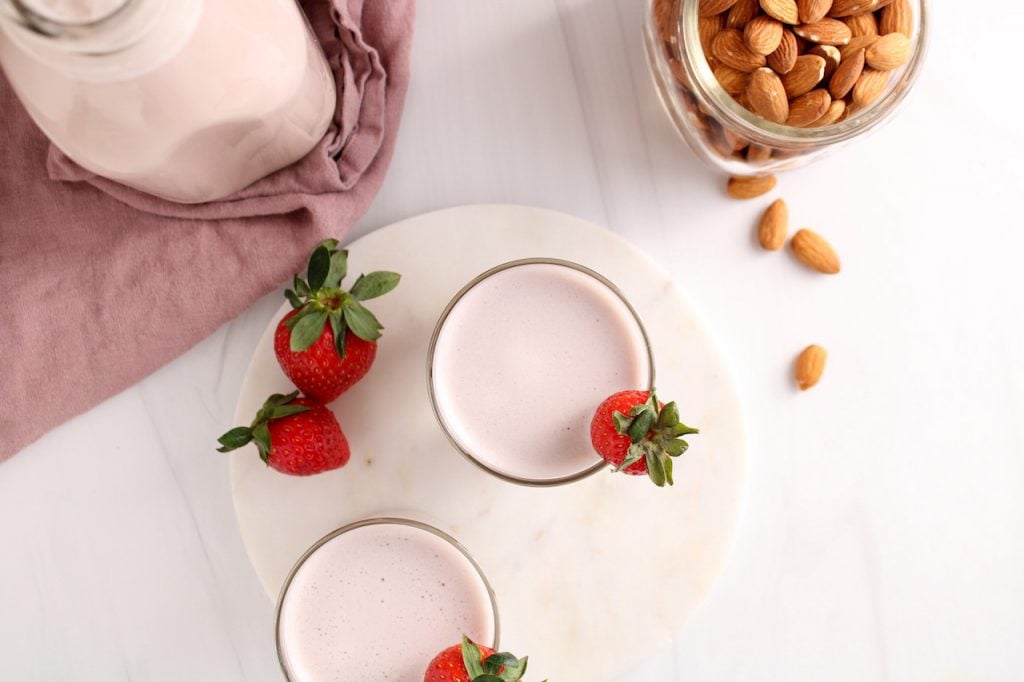
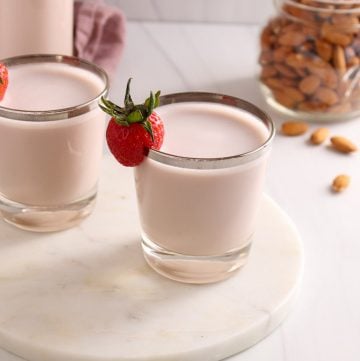
Learn how to make homemade strawberry almond milk right in your kitchen! It features raw almonds (or store-bought almond milk) and strawberries blended together to give you a tasty dairy-free alternative to regular milk that's infused with strawberry flavor. Pour it over cereal, use it in oatmeals and smoothies or simply drink it straight by the glass. Easy and 100% vegan.

Making your own plant-based milk at home is very satisfying, plus so much easier than it seems!
I actually think that homemade nut milks are far more delicious than store bought ones, plus you will know every ingredient that's inside: no preservatives, no added color, no refined white sugar and no artificial flavors.
And we adore flavored milks! One of our most loved plant milk we make at home are hemp chocolate milk, strawberry oat milk and blueberry milk with lavender, but now this strawberry flavored almond milk is our absolute new favorite one.
This version includes 3 simple ingredients only: raw almonds, fresh (or frozen) strawberries and a little sweetener (dates or maple syrup). I also love to add vanilla extract, but this is optional. They are blended with water to make a super creamy and rich delicious dairy-free milk.
Although making dairy-free milks at home might seem a little complicated, I assure you that it is quite easy to make. All you have to do is soak the nuts overnight, then blend the ingredients and strain to smooth.
BUT also, I will share how you can make it using store-bought almond milk instead of using actual raw almonds, so you have an option to make it a little quicker without any straining steps needed.
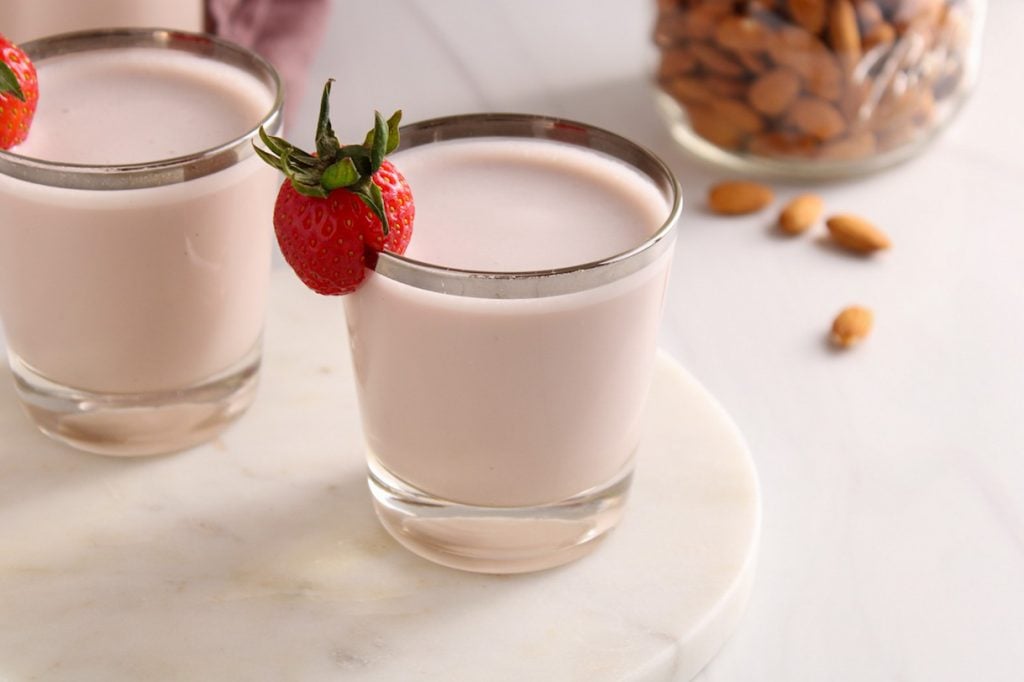
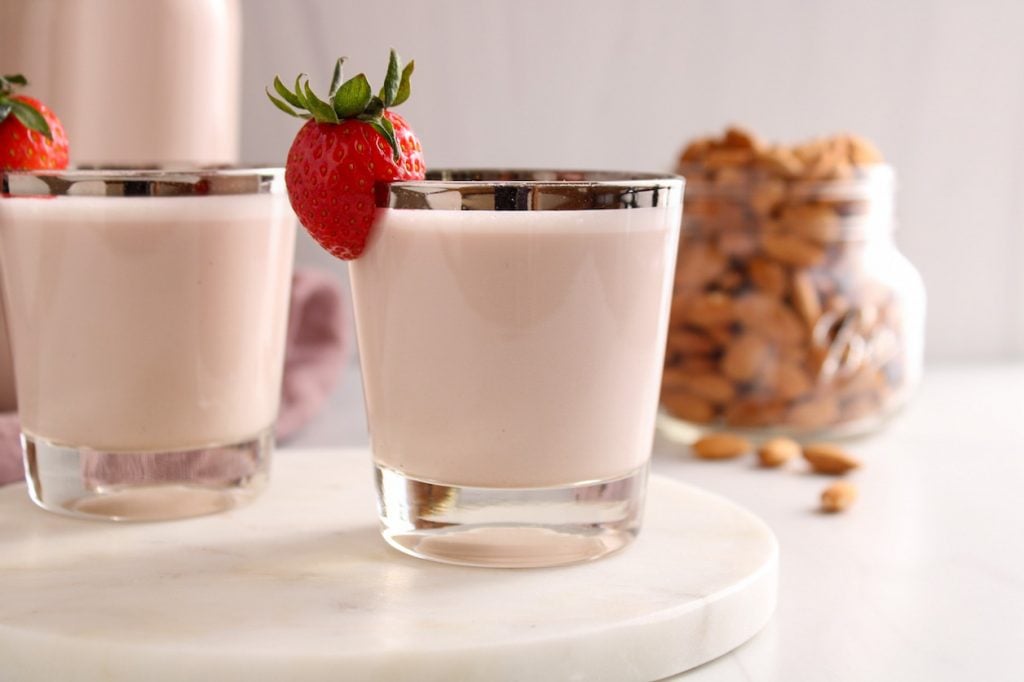
This nut milk is smooth, slightly sweet and naturally flavored with strawberries. So flavorful. We just cannot get enough of it!
Let me know if you made it! ❤️
Highlights of this recipe
- Easy homemade milk recipe
- Requires 3 simple ingredients
- Include an option to make it using already-made almond milk!
- Healthier, cheaper and more delicious than store-bought
- Versatile and can be sweetened as much as you want (or not at all!)
- Perfectly creamy, smooth and silky, so satisfying!
- Serve it in so many different ways
- Vegan, dairy-free and naturally gluten-free
What you will need to make strawberry almond milk
Equipment
- High-speed blender: better than regular blenders to make milk from almonds, but see options below if you don't have one.
- Straining material: such as nut milk bag, cheese cloth or French press.
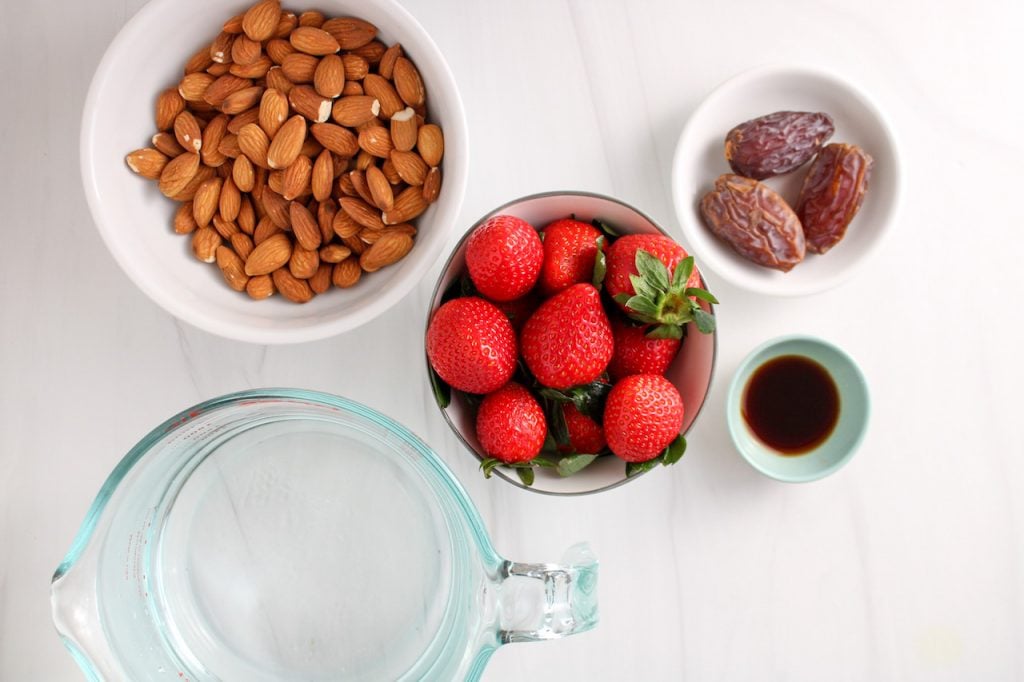
Ingredients
- Raw almonds
- Strawberries, fresh or frozen
- Vanilla extract (optional)
- Medjool dates or maple syrup (also optional)
How to make homemade strawberry almond milk (using raw almonds)
Making your own nut milk is a little bit of a process, but do it once and you will realize how easy it is!
1- First, soak your almonds. Simply cover the nuts with plenty of water and let them sit at room temperature for 8-12 hours. I usually soak mine overnight so it is ready to go the next morning. Then, drain and rinse the nuts using a colander.


2- Transfer the almonds, strawberries, vanilla extract, dates (or maple syruP) and water to a high-speed blender and blend until smooth (this can take 1-2 minute).


3- Then, strain the milk. I find that using a nut milk bag works the best, but you can also use different methods (see below for more options).


Taste the milk and adjust the sweetness to your liking (add extra maple syrup if needed, which will depend on the strawberries you used).
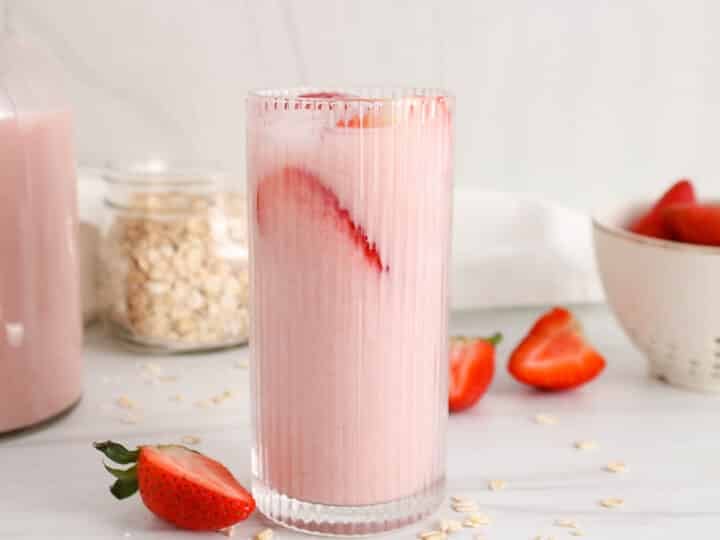
Transfer to an air-tight pourable container or a jar and keep in the fridge. The milk is even better when cold!
How can I make it without raw almonds
Using store-bought almond milk to make this recipe would be even easier: simply blend the almond milk with strawberries, vanilla and sweetener (if using).
If you are using a flavored and sweetened milk, then be sure not to add any dates or maple syrup or vanilla extract.
Also check for consistency: you might need or not to strain the milk. In that case, simply pour through a fine-mesh colander to remove the strawberry seeds and ensure the milk is super smooth.
Watch how to make it

How to strain the milk: 3 different ways
- Nut milk bag: This is my preferred method. A nut milk bag is really not that fancy nor expensive, it is simply a bag made with a fine mesh fabric. It is often a sturdier fabric and it holds well when placed over a bowl. I also find it easier to hold the extremities when straining. These nut milk bags from Bellamei are the ones that I use.
*To use a nut milk bag, place the bag over a large bowl and pour the milk inside the bag. Then, lift the sides of the bag, twist it to lock the liquid at the bottom and press using your hands to help the milk filter out. - Cheesecloth: It is made from a very soft and delicate mesh-like fabric. It sometimes comes in a very large or long tissue, so you might have to cut to get the desired size. I have used it a few times in the past, but I found it more difficult to manipulate compared to a nut milk bag.
*To use a cheesecloth, place a few large pieces of fabric on top of each other (2-3) over a fine mesh colander, pour the milk over very slowly, then lift the side of the cheesecloth to strain the milk. - French press: If you have a French press, then use it! It will be a bliss to strain your nut milk!
*To use a French press, simply pour the blended milk inside, then press the mesh down to compress the pulp at the bottom. Pour the filtered milk (keeping the filter down) and enjoy!

What to do with the leftover pulp from straining the nut milk
After straining your milk, you will be left with the pulp from the almonds. Simply store it in an air-tight container in the fridge and reuse it!
You can add the pulp to all sorts of baked goods like muffins, cookies and pancakes. I also like to simply scoop it in my morning oatmeal and blend some when making smoothies.
You can also turn the pulp into almond flour or make granola with it. This article: "What to do with leftover nut and seed pulp" might help you find tasty ways to reuse it!
Storage tips
Once the milk is strained, transfer to a pour-able container and store in the fridge for up to 5 days. Mix or stir well before enjoying, as some separation can occur.
You can also freeze it for up to 3 months. To do so, I recommend to use an ice cube freezing tray and add the frozen strawberry milk cubes to your smoothies.
How to enjoy this strawberry almond milk?
You can use strawberry flavored milk the same way you use almond milk:
- pour it over your cereal or granola, it would particularly pair well with this easy almond vanilla granola.
- instead of regular plant milk, use this strawberry milk when making overnight oats!
- use it to flavor oatmeal recipes or try it in this barley breakfast bowl.
- prepare your pancake batter using this milk.
- make a strawberry bubble tea!
But really, we love it best simply by the glass!
If you want to enjoy it right away after blended, then you can blend a few ice cubes to help chill the milk or simply pour in a glass filled with ice cubes. You can also enjoy it warm! Simply warm up on the stove or using the microwave and sip on it just like a cup of warm milk tea before bedtime.
FAQ's
Technically, yes, but the result might not be as great. Almonds, even after being soaked, are still quite hard and regular blenders are not strong enough to crush entirely the nuts to create a rich flavorful milk. This article: "Can You Make Dairy-Free Alternative Milk In a Regular Blender?" will give more information about the best type of blender to use when making almond milk.
If you have a regular blender and you are dying to make your own nut milk, then check out this homemade cashew chocolate milk recipe!
Or, simply make it using store-bought almond milk!
No! I always leave them on and assuming you will be filtering your milk, then the small pieces of skin will be removed to ensure the milk is not grainy.
Yes! You can swap for blueberries, cherries or raspberries or even, use a mix of different berries.
When using almonds, then I recommend you to strain it. Other nut milks made with, for example, cashews, hemp seeds or macadamia nuts, don't always need filtration. But, when using almonds, you won't be able to blend the mixture enough to completely dissolve the pulp. If you do not have any of the equipment described above, then I have seen nut milks strained simply using a fine mesh colander (go slow and scrape with a spatula) or try making a hemp seed milk!
Soaking your almonds will make them nicely plumped, softer and easier to blend, but there is a quick method to bypass this step if you are in a rush. You can first boil water, then add the almonds, remove from the heat and let soak for about 30-60 minutes. This should be enough to make them more blend-able!
Absolutely! When out of the strawberry season, then feel-free to use frozen strawberries. You can let them slightly thaw before using just so they blend a little easier.
Other strawberry recipes you might like
- Strawberry and chocolate baked oatmeal
- Strawberry, chocolate and banana smoothie
- Barley and oat breakfast bowl
- Strawberry overnight oats
- Strawberry banana smoothie bowl
- Strawberry muffins
- Strawberry chocolate bars
- Vegan strawberry trifles
- Vegan strawberry pop tarts
- Strawberry latte
More plant-based flavored milk recipes to try
- Hemp chocolate milk
- Lavender milk tea
- Blueberry lavender almond milk
- Vegan cinnamon horchata
- Cashew chocolate milk
I hope you enjoy this strawberry almond milk as much as we do! If you try it, please leave a comment below and rate the recipe to let me know how it was. Your feedback is so helpful!
Let's stay in touch with Instagram, Pinterest and Facebook. Also, don't forget to subscribe to my newsletter to be sure not to miss anything.
📖 Recipe
Strawberry Almond Milk
Equipment
- Blender
- Nut milk bag if using actual raw almonds, see below
Ingredients
If using raw almonds
- 1 cup raw almonds - soaked for 8-12 hours
- 4 cups water
- 1½ cup fresh or frozen strawberries - hulled and roughly chopped
- 3-4 Medjool dates - or a splash of maple syrup to taste
- 1 tsp vanilla extract - optional
If using store-bought almond milk
- 4½ cups plain almond milk
- 1½ cup fresh or frozen strawberries - hulled and roughly chopped
- 3-4 Medjool dates - or a splash of maple syrup to taste
- 1 tsp vanilla extract - optional
Instructions
If using raw almonds
- Soak the almonds, drain and rinse before using. This will ensure they are soft enough to blend. I like to soak them overnight so I can prepare the milk the next morning.
- Transfer the almonds alongside all the other ingredients (water, strawberries, dates or maple syrup and vanilla extract, if using) to a blender. Blend until smooth, can take 1-2 minute.
- Place a nut milk bag over a large bowl, then pour the milk into the bag. Lift the sides of the bag, twist so the liquid is trapped to the bottom and press to help strain the milk out. (see notes)
- Taste the milk and adjust sweetness to your taste (with more maple syrup, depending on how sweet your strawberries are).
If using store-bought almond milk
- Simply add the milk, strawberries, sweetener and vanilla extract (if using) to a blender and blend until smooth.
- You don't need to strain if making the milk without actual almonds, although you might want to pour through a fine-mesh colander to remove any extra strawberry seeds and ensure the milk is super smooth.
- Transfer the milk in a pourable container and keep in the fridge for up to 5 days. Stir well before pouring.
- Serve over cereal, use in your oatmeal or smoothies or simply drink by the glass. Enjoy!
Video
Notes
- To strain the milk, you can also use cheesecloths, fine mesh colander or a French press. See the blog for more details.
- After straining your milk, you will be left with a pulp. Here is an article about what you can do with the leftover nut milk pulp.
- I recommend you to use a high-speed blender to make almond milk from actual raw almonds. The richness and flavors will be better. If you have a regular blender, then check out this chocolate cashew chocolate milk recipe or hemp chocolate milk, or simply make it using store-bought almond milk.
- You can use frozen strawberries! Simply let them thaw slightly so they blend better.
- Nutrition: please note that the nutritional information is an estimate per serving provided for informational purposes only (calculated by software) and accuracy is not guaranteed. Consult with your healthcare provider or a registered dietitian if you need precise nutrition calculations for health reasons.
NUTRITION
Pin it for later!


Leave a Reply