This simple kimchi hummus bursts with amazing Korean flavors and is SO easy and fast to make. Features canned chickpeas, jarred kimchi, a little tahini and optional sriracha sauce for extra heat. Serve as a dip or spread in sandwiches. This recipe also is vegan (simply use vegan kimchi!), gluten-free and so healthy too!

If you are not into hummus or usually find it a little bland, then you have got to try this kimchi hummus, it is anything but boring!
You can be quite creative when making hummus from scratch and add any flavoring boosters to make a classic hummus more interesting and personalized. I love this broccoli hummus for its surprising creaminess from adding steamed broccoli to the chickpeas, but you can also add other veggies or spices you like.
And since I am in a loving-kimchi phase right now (you should check out this kimchi ramen soup I make every week!), I wanted to try making hummus with kimchi and we absolutely adored the result. Adding kimchi to chickpeas really create a hummus that's intense in Asian flavor: both my husband and I ravenously ate the whole batch at once!
We also enjoyed its creamy pinkish appetizing look and you can make yours mild or spicy, depending on your heat tolerance. The kimchi brings a whole lot of garlicky, sour-ish, tanginess and saltiness to a classic hummus mixture, making it an easy and convenient add-in ingredient that really boosts the yumminess.
And I actually find this recipe easier to make compare to a regular hummus dip. It simply includes canned chickpeas, kimchi, tahini and a little sriracha to make it spicier (although optional). Kimchi is already so full of flavor, you don't really need to add any lemon or garlic to the hummus. This healthy chickpea dip has such a nice zing to it and bursts with amazing Korean flavors. We couldn’t get enough of it!
Plus, it really only takes a few minutes to prepare without much of a fuss. Simply process the ingredients until smooth, adjust texture with more flavor-packed kimchi juice from the jar as needed and you can serve it right away.
We love this spicy hummus simply as a dip, but also can use leftovers in tortilla veggie wraps, to make a spicy creamy sauce for pasta, use over buddha bowls, spread over toast with avocado, etc. You can make it ahead and sneak it in so many meals!
You can also swap regular mayo for this flavored hummus to add more flavor, but also to boost the nutrients of your sandwiches. Chickpeas are loaded with fiber and plant-based protein, plus kimchi has a tons of healthy-gut properties, thanks to the fermentation process.
I used a vegan kimchi made without fish sauce (which is easy to find by the way) and I made this recipe 100% plant-based, made without refined oil, and lower-in-added salt.
I hope you give it a try! If you do, let me know how you liked it! ❤️

Highlights of this recipe
- Simple 4-ingredient recipe.
- Done within minutes.
- Filled with flavors.
- You can decide to make it spicy or not or somewhere in between.
- Versatile ways to use it.
- Healthy: loaded with fiber, plant-based protein, vitamins + minerals and also has a nice serving of probiotics brought by the fermented kimchi, which can help support and feed your healthy gut bacterias.
- Great for meal-prep.
- Vegan (make sure you choose a vegan kimchi!), oil-free, gluten-free and naturally nut-free.
Ingredients you'll need
- Chickpeas: I recommend to use canned chickpeas for their convenience, although you can also cook your own chickpeas from scratch and use them to make this recipe.
- Kimchi: use any brand you like, but I obviously use a kimchi that's vegan, meaning there is no fish sauce used in the making of the kimchi. Vegan kimchi is super easy to find now and I get mine either at our local Asian grocery store or at Hannaford (you can find the Nasoya vegan kimchi over there). Just look in the fridge close to the produce.
- Tahini: helps create a super creamy consistency and brings a mild background flavor of toasted sesame. Tahini is used in the making of traditional hummus, but also pairs very well with the Asian flavors from the kimchi.
- Sriracha: optional, but even just a small amount will boost the flavor. Simply add as much as you want depending on your heat tolerance.

How to make kimchi hummus
This recipe is done within minutes without much of a fuss, making it a great last minute dip to use for snacking, sandwiches or to serve for any impromptu guests!
Process
Start by measuring the kimchi. To do so, drain as much of the liquid as you can. It will remain moist, but you just don't want a puddle of juice while measuring so you can add the flavorful juice as needed later. If adding too much of the juice up front, then you might end up with a watery hummus.
To your food processor, add the chickpeas, kimchi, tahini, sriracha (if using) and 2 tablespoons of kimchi juice.
Process until smooth taking a break or two to scrape the walls.
Then, check on the consistency and adjust with more kimchi juice if needed.
Garnish and serve
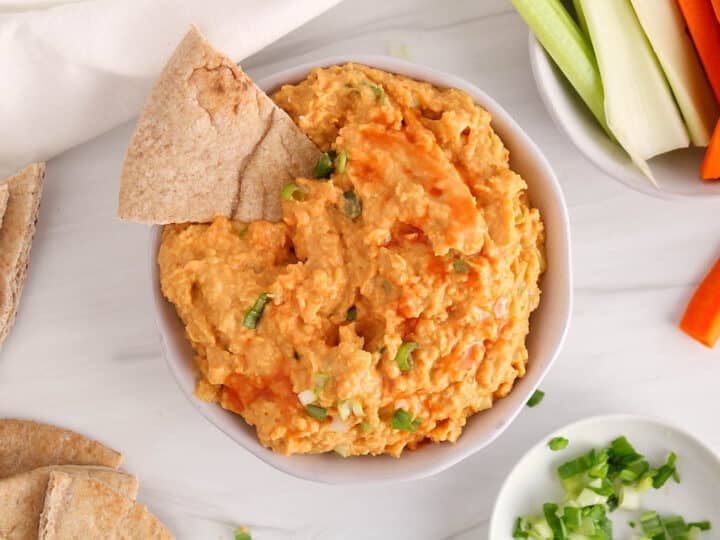
Transfer to your serving bowl and then garnish with more chopped kimchi and chopped chives or green onions.
Serve with crackers, pita bread and veggies sticks or use in sandwiches or wraps.
Enjoy!


Helpful tips
- Kimchi is usually so flavorful, so you might not need to add any salt or lemon juice to this hummus recipe. But, make sure to taste and adjust flavor as needed.
- Process long enough to create a super smooth texture, which will depend on the type of food processor you have. For an extra smooth consistency, you can also remove the skins on the chickpeas, although I never take the time to do as I don't mind a little texture anyway.

Variations to the recipe
You can easily tweak this recipe as you wish. Here are a few ideas:
- Add more vegetables: good pairings with the kimchi flavor would be jarred roasted red pepper, fresh green onions or roasted sweet potato. You can either blend the vegetables to smooth with the chickpeas or pulse them in, especially for the green onions, so you keep some texture. This can be a good way to add more vegetables to your diet, sneak them in spreads and dips!
- Make it garlicky: kimchi already has some garlic to it, but if you are looking for an extra garlicky dip, then simply add a clove of garlic to the food processor. You can crush it first before blending to ensure you don't end up with large chunks of raw garlic.
- Add some lemon juice: the fermented kimchi brings a robust tangy flavor to the hummus, but taste to see if you want more of it but squeezing some extra lemon (or lime) juice!
- Include ginger: this would pair so well with the Korean kimchi flavor. Simply grate some fresh ginger in the food processor and taste to adjust how much you want to add.
- Make it ultra spicy: my kimchi wasn't really spicy, even though it says "spicy" on the packaging! But different brands of kimchi will vary in spiciness, so you can adjust how spicy you want your hummus to be depending on your kimchi. To make it spicier, then add as much as you want of the sriracha or toss in some red pepper flakes to the food processor.
- Fresh spin: you can add some fresh cilantro, parsley or even basil to add more fresh flavor to your hummus dip.
Serving suggestions
I love to serve the kimchi hummus as a dip garnished with more kimchi to point out what's in there, but also for a nice presentation. Simply roughly chop the kimchi first so it is easy to scoop out.
Add some chopped chives or green onions for a nice contrast in color and some sesame seeds for a little crunch.
You can also serve this recipe in so many other ways then a dip! This can be great if you have some extra and you want to change things up when enjoying the leftovers. Here are some other ideas:
- Spread in tortilla wraps with veggies
- Burgers (try with this oat and chickpea burgers!)
- Over buddha or rice bowls, especially paired with this falafel buddha bowl
- Thin out the hummus and serve as a creamy sauce for noodles. You can see how I do this in this hummus pasta post!
- Also simply use as a salad dressing. Add some extra water to it and whisk well until thin enough to pour over lettuce or roasted vegetables.

Storage tips
This hummus recipe stores pretty well in the fridge, making it a great recipe to meal-prep ahead. Just keep in an air-tight container and try to enjoy within 4-5 days. Stir well before serving leftovers as some separation may occur over time.
FAQ's
Yes you can, although the texture won't be as silky and rich. If you simply don't like or have tahini, then you could swap for a little almond butter or even peanut butter instead to add healthy fats and help whip up the texture a bit.
Kimchi is usually naturally gluten-free, although you may want to check on packaging to confirm.
Yes! Simply look for a milk kimchi and also, omit the sriracha sauce completely.

More healthy dip recipes you might like
- Hoisin peanut butter sauce
- Vegan tzatziki
- No tahini baba ganoush
- Vegan avocado lime cream
- Avocado green goddess dressing
- Vegan Hawaiian cheese ball
- Sweet and spicy orange sauce
- Vegan chipotle mayo
- BBQ ketchup
- Tofu spread
- Vegan white queso
- Protein guacamole
- Butter bean hummus
- Lemon dill hummus
I hope you enjoy this kimchi hummus recipe as much as we do! If you try it, please leave a comment below and rate the recipe to let me know how it was. Your feedback is so helpful!
Let's stay in touch with Instagram, Pinterest and Facebook. Also, don't forget to subscribe to my newsletter to be sure not to miss anything.
📖 Recipe

Spicy Kimchi Hummus
Equipment
- Food processor
Ingredients
- 15 oz canned chickpeas - rinsed and drained
- ¾ cup kimchi ( I used a vegan kimchi, see below) - plus about ¼ cup extra chopped kimchi for garnishing, if desired
- 2 tbsp tahini paste
- 2-3 tbsp juice from the jar of kimchi - plus more for garnishing, if desired
- 1 tbsp sriracha (or 1 teaspoon of red pepper flakes) - optional, for a spicier recipe
Instructions
- Drain the kimchi to measure it and keep the kimchi juice aside.
- In a food processor, add the chickpeas, kimchi, tahini and sriracha sauce. Then, add 2 tablespoons of the kimchi juice.
- Process until smooth and creamy. You may need to take a break or two to scrape the walls.
- Then, taste and adjust consistency with more kimchi juice as needed and see if it needs a little salt or not (depending on the kimchi you used).
- Scoop in a serving bowl and garnish with more chopped kimchi, sesame seeds and chopped chives or green onions, if desired. Serve with crackers or pita bread or spread in sandwiches.
Video

Notes
- Storage: keep in an airtight container in the fridge for up to 4-5 days. Stir well before serving as some separation might occur over time.
- Kimchi is not naturally vegan since the classic recipe uses fish sauce to make it. BUT, vegan kimchi is now very easy to find anywhere, so just check on the ingredient list. I used the vegan kimchi from the brand Nasoya that I found at Hannaford.
- You can add some fresh cilantro, lemon juice, garlic or even some extra veggies (such as roasted red pepper) to your hummus recipe. See the blog post for more ideas!
- Nutrition: please note that the nutritional information is an estimate per serving provided for informational purposes only (calculated by software) and accuracy is not guaranteed. Consult with your healthcare provider or a registered dietitian if you need precise nutrition calculations for health reasons.
NUTRITION
Pin it for later!


Leave a Reply