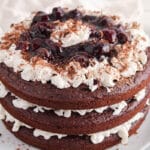
Vegan Black Forest Cake
So delicious and rich, this vegan black forest cake is made by combining layers of dark chocolate cake with a sweet cherry filling and coconut whipped cream. Perfect for birthday parties, Christmas or for any occasion where you need a gorgeous yummy cake! This version is 100% dairy-free, egg-free and plant-based.
Servings: 12
Calories: 471kcal
Ingredients
For the chocolate cake
- 3 cups plant-based milk
- 1 ½ tbsp lemon juice
- ⅓ cup coconut oil melted
- 2 tsp vanilla extract
- 3 cups all-purpose flour
- 2 cups light brown sugar
- 1 ½ cups raw cacao powder
- 1 tbsp baking powder (not teaspoon!)
- 2 tsp baking soda
- ¼ tsp salt
For the cherry filling
- 1½ pound frozen sweet cherries (24 oz or about 3 cups) I used 1 package + a half of the 454 g. bag of sweet cherry
- ¼ cup water
- ½ cup maple syrup
- 2 tbsp cornstarch (+ 2 tablespoons water)
To make the cake
- 6-12 oz vegan whipped cream homemade or store bought, see notes below
- shredded or shaved dark chocolate optional, to decorate
- kirsch (cherry liquor) optional
Instructions
Make the chocolate cakes
- Pre-heat the oven to 350º and grease 3 round cake pans of 9 inches each. Also, add a circular piece of parchment paper to the bottom of each cake pan.
- In a large bowl, combine the flour, raw cacao powder, brown sugar, baking powder, baking soda and salt.
- In a medium bowl, combine the plant milk with the lemon juice and let it sit for about 5 minutes. Then, add the melted coconut oil and vanilla extract.
- Pour the wet ingredients over the dry and stir to combine. Divide the batter equally in between the cakes pans and even their surface using a spatula.
- Bake in the oven for 26-29 minutes. All ovens are different, so watch carefully! The cake are done when a toothpick comes out clean. Once the cakes are done, let them completely cool down on the counter.
Make the cherry filling
- While the cakes are baking, make the cherry filling. In a medium sauce pan, add the frozen cherries, water and maple syrup. Heat over medium-high and stir often. The cherries will thaw and get saucy. Once the mixture comes to a boil, then let is simmer uncovered for about 10 minutes.
- Meanwhile, combine the cornstarch with the 2 tables spoon of water in a small bowl or mug. Once the cherries are done cooking, then pour the cornstarch slurry over the simmering cherries and stir right away. It should thicken very quickly within a few seconds. Remove from the heat and let the mixture completely cool down (you can transfer to the fridge).
Build the cake
- Once the cakes and cherry filling are cooled down, then you can build the cake.
- I recommend to slice the top off of 2 of the cakes (the 2 cakes that go at the bottom). You can watch my quick video to see how to do this, it is easy. Removing the dome shape can help the filling hold better, I even create a subtle concave shape to give more space to the filling and whipped cream so it does not squeeze out.
- Place a cake over a serving plate and then distribute some whipped cream all around the cake (like a wall). Then dollop about a third of the cherry filling in the middles up to the edge of the whipped cream. Add a little more whipped cream over the cherry and then place a second cake over.
- Repeat the filling step starting with a wall of whipped cream, then cherry filling in the center and more whipped cream over. Place the third cake over.
- If you wanted to add some Kirsch, then you can brush some of it over the chocolate cake before adding the whipped cream and cherries.
- Decorate the top of the cake with some more whipped cream and the remaining of the cherry filling. You can have some of the cherry filling fall on the side if you want a gooey look or keep it more neat. Add some shaved dark chocolate over and voila! Enjoy!
Video
Notes
- I used store bough whipped cream for this cake. I wanted something convenient and a whipped cream that holds well within the layers. I used the coconut whipped cream from the brand Reddi-Wip. I used a 6 oz can, although I had just enough. If you wanted to add more whipped cream then what you see in my video and pictures, then get a second can. You can also make your own vegan coconut whipped cream from scratch if you prefer! In this recipe, simply omit the spices and make at least double batch to have enough.
- This cake stores pretty well in the fridge for a few days in an air-tight container. The cherry filling and whipped cream will soak through the cake as it rests, which keeps the cake gooey and moist. You can also freeze it!
- This cake is fairly easy to make, but still, I recommend to have a peak at my blog post where I share more tips and trouble shooting that might help you.
- Nutrition: please note that the nutritional information is an estimate per serving provided for informational purposes only (calculated by software) and accuracy is not guaranteed. Consult with your healthcare provider or a registered dietitian if you need precise nutrition calculations for health reasons.
Nutrition
Calories: 471kcal | Carbohydrates: 92g | Protein: 7g | Fat: 12g | Saturated Fat: 8g | Polyunsaturated Fat: 0.4g | Monounsaturated Fat: 2g | Cholesterol: 11mg | Sodium: 381mg | Potassium: 455mg | Fiber: 7g | Sugar: 57g | Vitamin A: 257IU | Vitamin C: 5mg | Calcium: 231mg | Iron: 4mg